使用 iOS 快捷指令上传文件到 MinIO(S3)
有点特殊需求,偶尔需要将 iPhone 上的照片传到 Windows 电脑上。基于现实考虑,采用了 MinIO 作为存储。
一、Docker 搭建 MinIO 服务
编写 compose.yml:
services:
  minio:
    image: minio/minio
    container_name: minio
    ports:
      - "127.0.0.1:9000:9000"
      - "127.0.0.1:9001:9001"
    volumes:
      - ./data:/data
    environment:
      - MINIO_ROOT_USER=yipai_minio
      - MINIO_ROOT_PASSWORD=yipai_minio_password
      - MINIO_BROWSER_REDIRECT_URL=https://minio.yipai.me/minio/ui
    command: server /data --console-address ":9001"
restart: unless-stopped启动服务:sudo docker compose up -d
二、配置 nginx 反向代理
先把域名指向 VPS,然后获取证书:
sudo certbot certonly --nginx --agree-tos --no-eff-email --staple-ocsp --preferred-challenges http -m minio@yipai.me -d minio.yipai.me编写 nginx 配置:
upstream minio_s3 {
   least_conn;
   server 127.0.0.1:9000;
}

upstream minio_console {
   least_conn;
   server 127.0.0.1:9001;
}

server {
    listen 443 ssl;
    listen [::]:443 ssl;
    http2 on;
    server_name minio.yipai.me;

    access_log  /var/log/nginx/minio.yipai.me.access.log;
    error_log   /var/log/nginx/minio.yipai.me.error.log;

    ssl_certificate /etc/letsencrypt/live/minio.yipai.me/fullchain.pem;
    ssl_certificate_key /etc/letsencrypt/live/minio.yipai.me/privkey.pem;
    ssl_trusted_certificate /etc/letsencrypt/live/minio.yipai.me/fullchain.pem;

    ssl_session_timeout  5m;
    ssl_session_cache shared:MozSSL:10m;
    ssl_session_tickets off;

    ssl_protocols TLSv1.2 TLSv1.3;
    ssl_prefer_server_ciphers on;
    ssl_ciphers ECDHE-ECDSA-AES128-GCM-SHA256:ECDHE-RSA-AES128-GCM-SHA256:ECDHE-ECDSA-AES256-GCM-SHA384:ECDHE-RSA-AES256-GCM-SHA384:ECDHE-ECDSA-CHACHA20-POLY1305:ECDHE-RSA-CHACHA20-POLY1305:DHE-RSA-AES128-GCM-SHA256:DHE-RSA-AES256-GCM-SHA384;
    ssl_ecdh_curve X25519:prime256v1:secp384r1:secp521r1;
    ssl_stapling on;
    ssl_stapling_verify on;
    ssl_dhparam /etc/ssl/certs/dhparam.pem;

   # Allow special characters in headers
   ignore_invalid_headers off;
   # Allow any size file to be uploaded.
   # Set to a value such as 1000m; to restrict file size to a specific value
   client_max_body_size 0;
   # Disable buffering
   proxy_buffering off;
   proxy_request_buffering off;

   location / {
      proxy_set_header Host $http_host;
      proxy_set_header X-Real-IP $remote_addr;
      proxy_set_header X-Forwarded-For $proxy_add_x_forwarded_for;
      proxy_set_header X-Forwarded-Proto $scheme;

      proxy_connect_timeout 300;
      # Default is HTTP/1, keepalive is only enabled in HTTP/1.1
      proxy_http_version 1.1;
      proxy_set_header Connection "";
      chunked_transfer_encoding off;

      proxy_pass http://minio_s3; # This uses the upstream directive definition to load balance
   }

   location /minio/ui/ {
      rewrite ^/minio/ui/(.*) /$1 break;
      proxy_set_header Host $http_host;
      proxy_set_header X-Real-IP $remote_addr;
      proxy_set_header X-Forwarded-For $proxy_add_x_forwarded_for;
      proxy_set_header X-Forwarded-Proto $scheme;
      proxy_set_header X-NginX-Proxy true;

      # This is necessary to pass the correct IP to be hashed
      real_ip_header X-Real-IP;

      proxy_connect_timeout 300;

      # To support websockets in MinIO versions released after January 2023
      proxy_http_version 1.1;
      proxy_set_header Upgrade $http_upgrade;
      proxy_set_header Connection "upgrade";
      # Some environments may encounter CORS errors (Kubernetes + Nginx Ingress)
      # Uncomment the following line to set the Origin request to an empty string
      # proxy_set_header Origin '';

      chunked_transfer_encoding off;

      proxy_pass http://minio_console; # This uses the upstream directive definition to load balance
   }
}
重启 nginx:sudo systemctl restart nginx
此时应该能通过域名 minio.yipai.me 访问 minio 网页控制台了。
三、搭建 MinIO 预签名服务
MinIO 不支持传统的 Basic Auth 或 Query String 签名方式,需要使用 AWS 的 AWS4-HMAC-SHA256 签名方法进行认证。但我们用快捷指令的方式,很难实现 AWS4-HMAC-SHA256 签名。所以需要用另外一个服务生成预签名 URL。我这里使用 Python + Vercel 的方式。
编写 app.py:
from flask import Flask, request, jsonify
import boto3
import os

app = Flask(__name__)

# 从环境变量中读取配置
MINIO_ENDPOINT = os.environ.get('MINIO_ENDPOINT')
MINIO_ACCESS_KEY = os.environ.get('MINIO_ACCESS_KEY')
MINIO_SECRET_KEY = os.environ.get('MINIO_SECRET_KEY')
BUCKET_NAME = os.environ.get('BUCKET_NAME')
API_KEY = os.environ.get('API_KEY')  # 用于 API 身份验证

# 创建 S3 客户端
s3_client = boto3.client(
    's3',
    endpoint_url=MINIO_ENDPOINT,
    aws_access_key_id=MINIO_ACCESS_KEY,
    aws_secret_access_key=MINIO_SECRET_KEY
)

@app.route('/upload', methods=['POST'])
def upload_file():
    # 验证 API 密钥
    provided_api_key = request.headers.get('X-API-KEY')
    if provided_api_key != API_KEY:
        return jsonify({'error': 'Unauthorized'}), 401

    # 检查是否包含文件
    if 'file' not in request.files:
        return jsonify({'error': 'No file part in the request'}), 400

    file = request.files['file']

    if file.filename == '':
        return jsonify({'error': 'No selected file'}), 400

    # 上传到 MinIO
    try:
        s3_client.upload_fileobj(
            file,
            BUCKET_NAME,
            file.filename,
            ExtraArgs={'ContentType': file.content_type}
        )
        file_url = f"{MINIO_ENDPOINT}/{BUCKET_NAME}/{file.filename}"
        return jsonify({'url': file_url}), 200
    except Exception as e:
        return jsonify({'error': str(e)}), 500

if __name__ == '__main__':
    port = int(os.environ.get('PORT', 5000))
    app.run(debug=False, port=port)
部署到 Vercel 还需要 requirements.txt 和 vercel.json,详见:https://github.com/robustmaster/minio-pre-signed-url
也可以直接克隆我这个仓库。
这个程序从环境变量里面拿 MINIO_ENDPOINT、MINIO_ACCESS_KEY、MINIO_SECRET_KEY、BUCKET_NAME、API_KEY,部署的时候需要在 Vercel 的环境变量里面添加这几项。
- MINIO_ENDPOINT,就是 MinIO 的网址,比如:https://minio.yipai.me
- MINIO_ACCESS_KEY,在 MinIO 的 Web 控制台添加。
- MINIO_SECRET_KEY,在 MinIO 的 Web 控制台添加。
- BUCKET_NAME,在 MinIO 的 Web 控制台添加存储。
- API_KEY,通过预签名网址上传文件时候的身份验证,防止被别人调用。自己生成一个,后续会用到。
这样就可以部署成功了,可以添加个自定义域名,比如:https://minio-psk.yipai.me。
四、创建 iOS 快捷指令
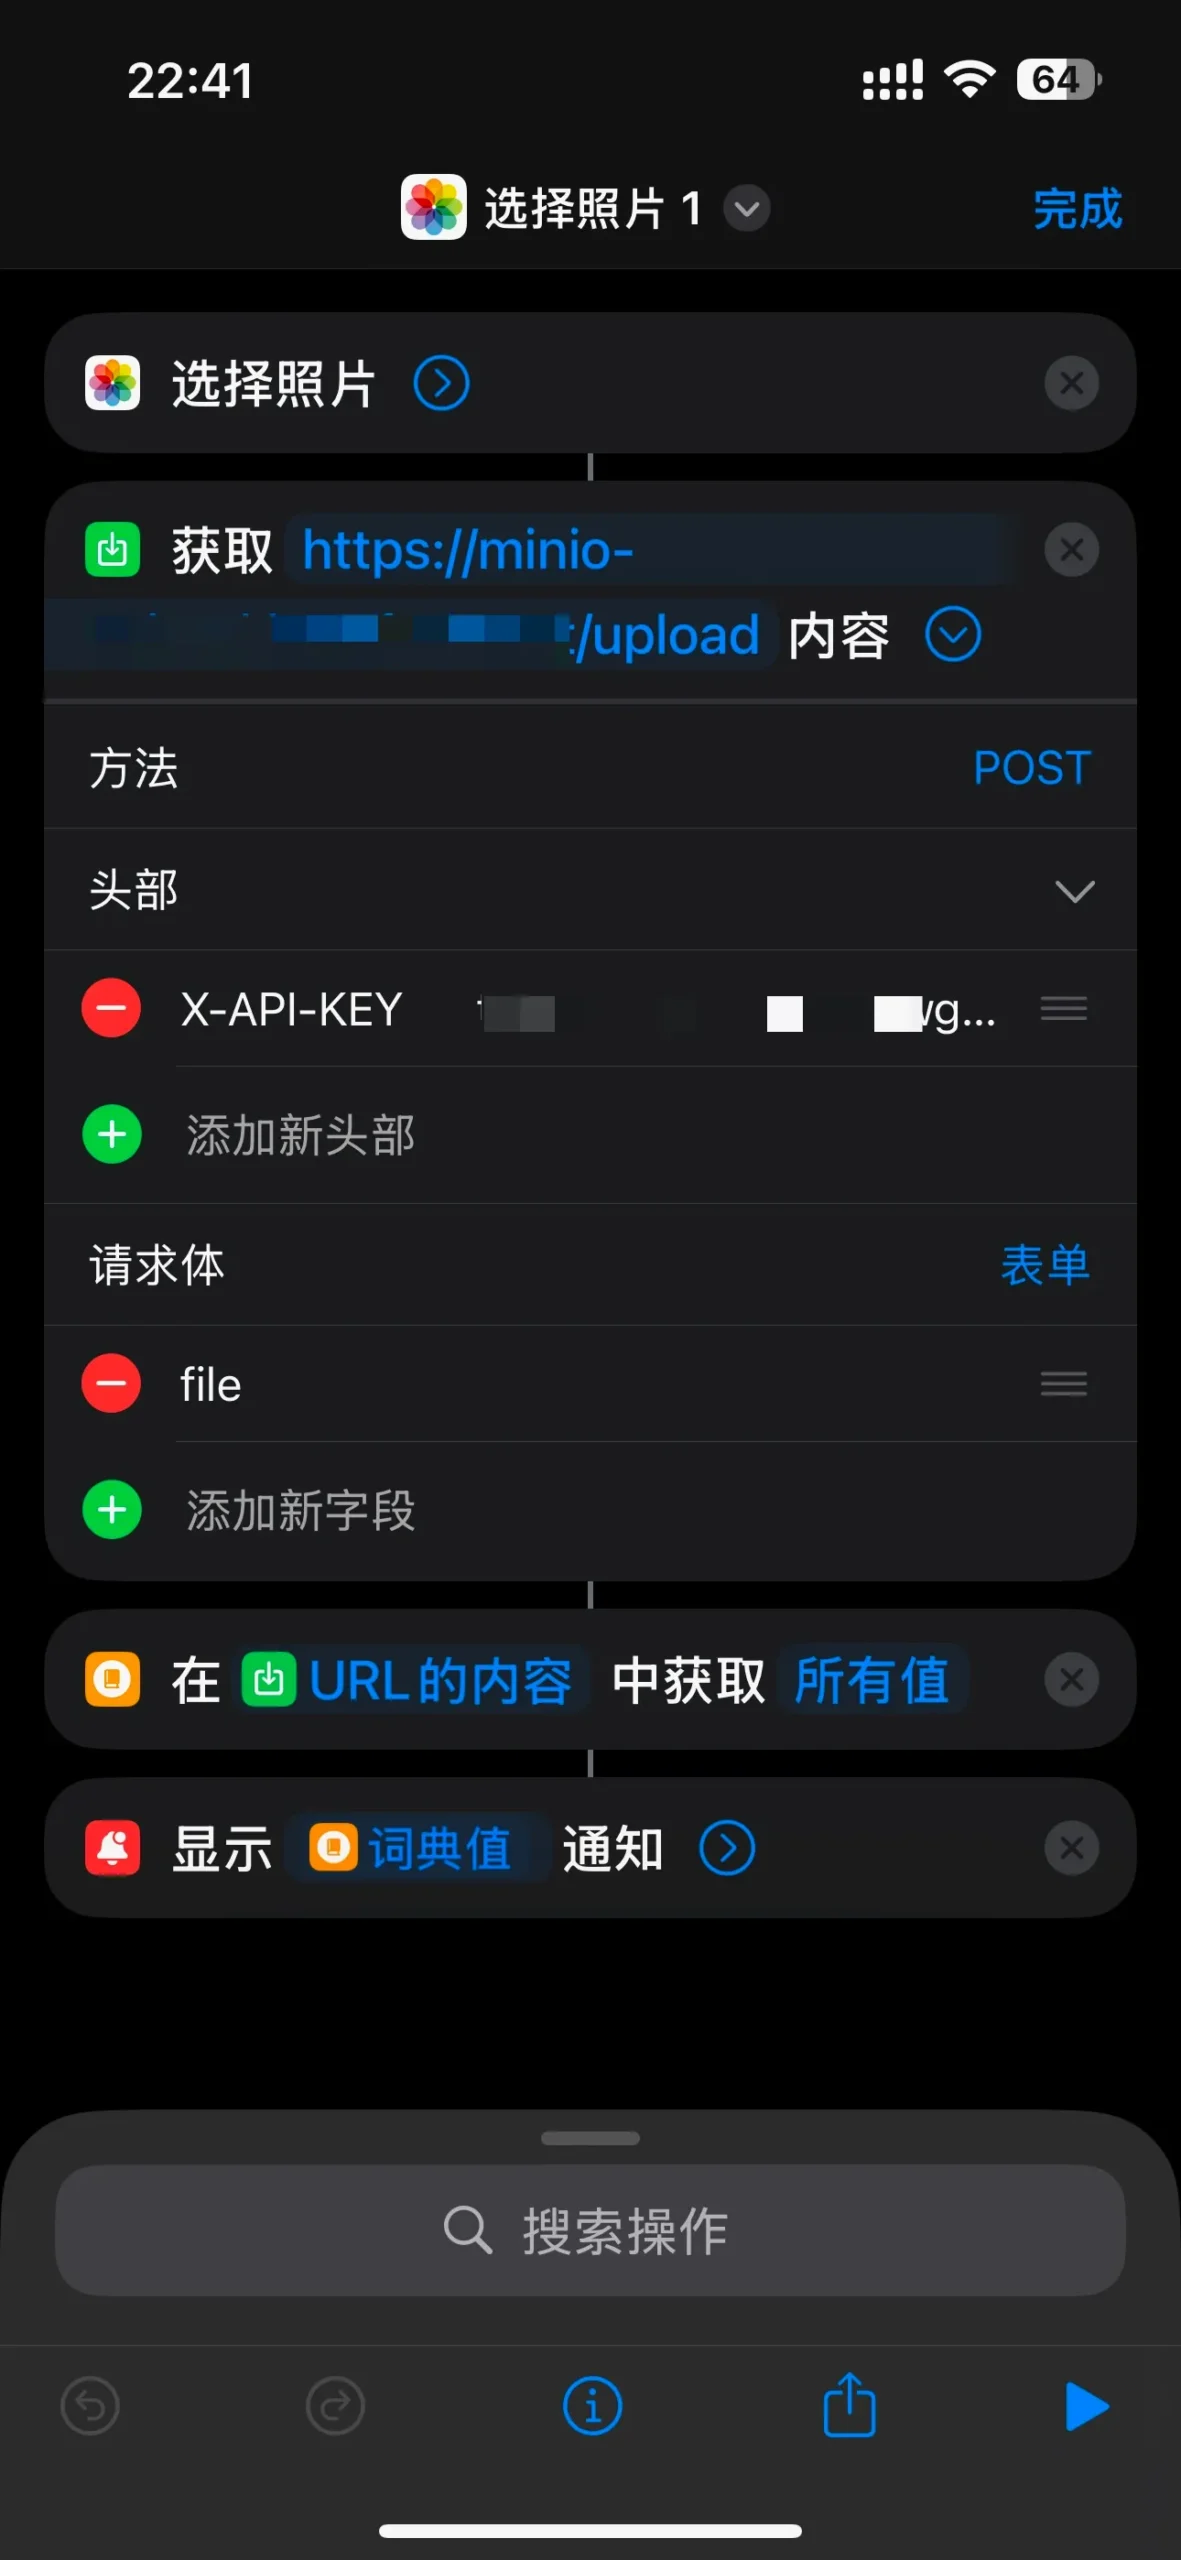
参考下图:


需要注意“获取网页内容”这个步骤,:
- 填写的预签名网址要在绑定的域名后增加 /upload 路径,比如: https://minio-psk.yipai.me/upload。
- 选择 POST 方法。
- 头部添加 X-API-KEY 的请求头,其值为上一步中添加的 API_KEY 环境变量的值。
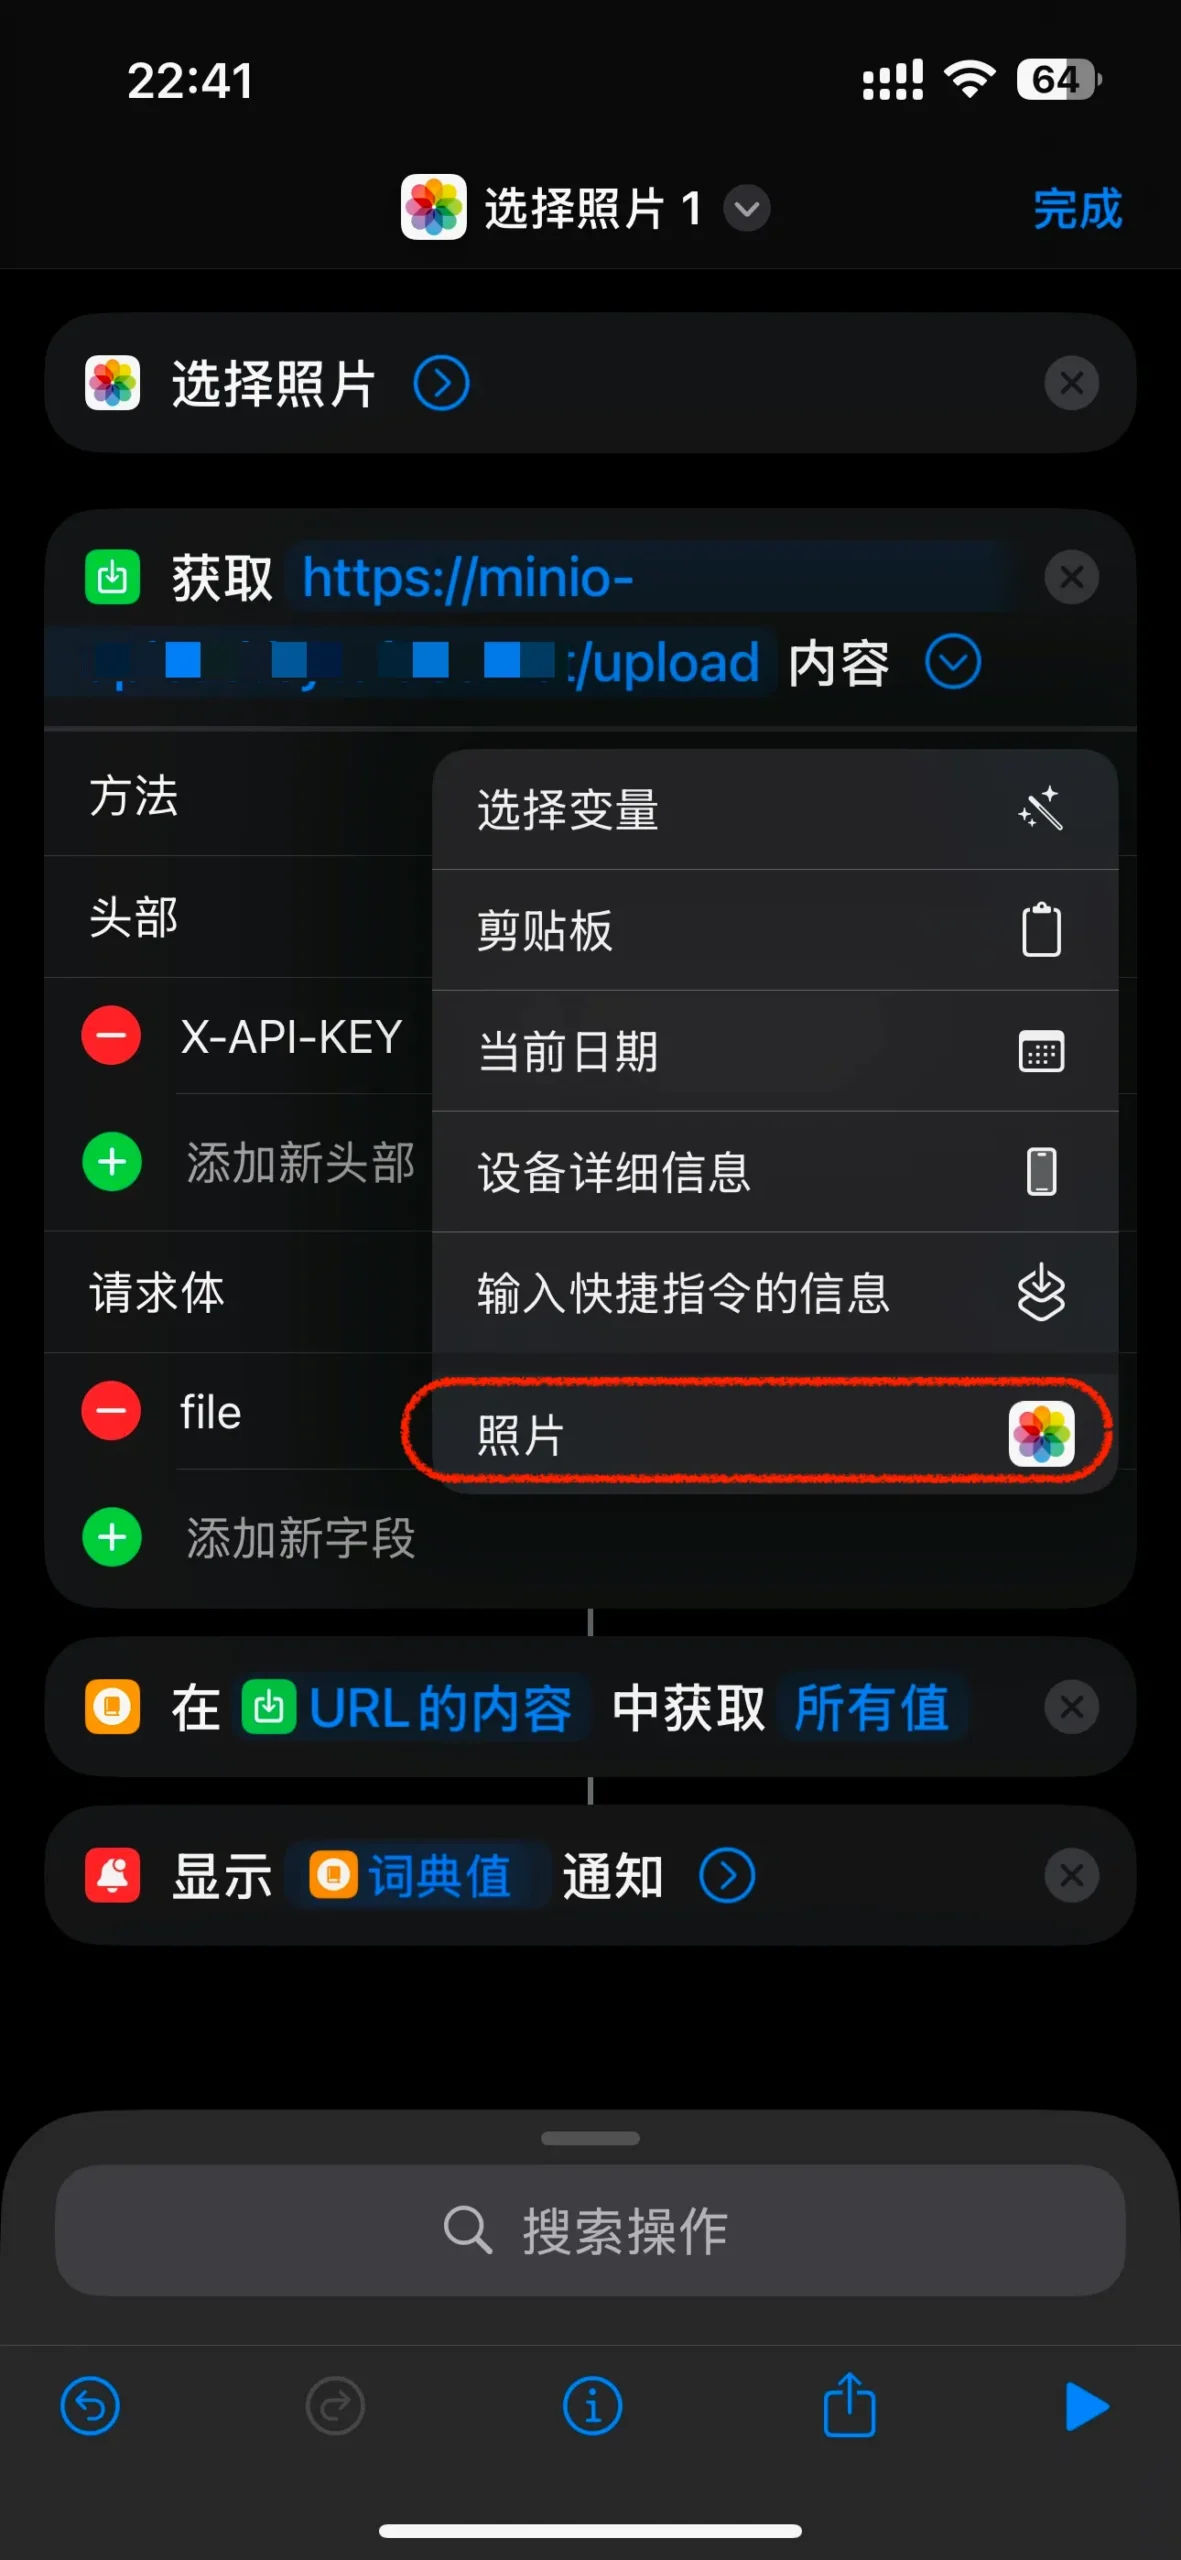
- 请求体选择“文件”,key 填 file,值选择“照片”。iOS 快捷指令应用的这步交互很奇怪,值选择“照片”后,值的字段显示不出来,但实际是选中了的。
如此,就可以使用快捷指令上传文件到 MinIO 指定的存储中了。
ios的快捷指令,我到现在都没用过~~
我用的也少,除了这个之外,还自己写了个base64编码解码,另外就是用别人的下载各种短视频的快捷指令。
请问这样上传的LivePhoto是如何存储的
上传的内容只是图片本身,不包括live photo附加的视频文件。
上传之后图片的元数据还在吗?
在。